funkz
New Hunter
Hello everyone and welcome to my thread!
In this thread, I'll try to document my progress in making the "fresh" Boba Fett costume. I'm somewhat new to making costumes, as this will be my first everything!
I'll try as much to list the materials and methods used so this thread can also serve as a resource for other newbies.
The helmet
Materials/tools used:
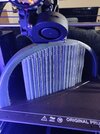
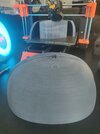
For the helmet I'm going to be using my 3D printer to print out all the parts. Since my printer's workspace is too small to print the entire helmet at once I've had to split it up in 4. The main parts of the helmet is printed with 0.20mm layer height with 15% infill.

Each quarter of the helmet takes approximately 24-32 hrs to complete printing

Some more finished parts

I used a lot of CA glue to put the parts together

After some light sanding:

Next it's time to apply a coat of filler primer, for this I used Simply Car Spray Putty that I found locally

After each coat of filler primer, I let it dry for at least 2 hrs before sanding it down again. The goal is to eliminate all visible print lines on the helmet

Meanwhile, we're gonna print the small parts for the helmet. This time I'm using 0.10mm layer height in order to reduce sanding and make the small details stand out more

Lightly sanded and cleaned the small parts

Test fit of the small parts to make sure they're good to use. Left side of the helmet here

Right side of the helmet with view finder in up and down position


Everything fits! So time to apply a coat of primer to paint later

Meanwhile I cut out a piece of a grinding shield visor to for the helmet. As you can see here, the print lines are entirely gone (apart from corners that were hard to reach, but this is gonna be covered up anyway.

Before applying any paint, I'm using a truck bed liner spray (Autotek Black) to give the helmet that rugged surface

This is all the progress so far. Right now I'm trying to let the paint bed liner paint dry for at least 24 hrs before I proceed to the next step.
Feel free to post a comment, feedback or give some critique to some of the methods I've used. For now, that's all I have.
See you next post!
In this thread, I'll try to document my progress in making the "fresh" Boba Fett costume. I'm somewhat new to making costumes, as this will be my first everything!
I'll try as much to list the materials and methods used so this thread can also serve as a resource for other newbies.
The helmet
Materials/tools used:
- Prusa MK3 i3 MK3S
- eSun PETG 1.75mm Solid Gray printing filament
- Sandpaper (120-600 grit)
- Gorilla CA glue
- Simply SP-037 Car Spray Putty (Used as filler primer)
- Autotek ATOOTBB500 Truck Bed Liner Spray Paint, Black
For the helmet I'm going to be using my 3D printer to print out all the parts. Since my printer's workspace is too small to print the entire helmet at once I've had to split it up in 4. The main parts of the helmet is printed with 0.20mm layer height with 15% infill.
Each quarter of the helmet takes approximately 24-32 hrs to complete printing
Some more finished parts
I used a lot of CA glue to put the parts together
After some light sanding:
Next it's time to apply a coat of filler primer, for this I used Simply Car Spray Putty that I found locally
After each coat of filler primer, I let it dry for at least 2 hrs before sanding it down again. The goal is to eliminate all visible print lines on the helmet
Meanwhile, we're gonna print the small parts for the helmet. This time I'm using 0.10mm layer height in order to reduce sanding and make the small details stand out more
Lightly sanded and cleaned the small parts
Test fit of the small parts to make sure they're good to use. Left side of the helmet here
Right side of the helmet with view finder in up and down position
Everything fits! So time to apply a coat of primer to paint later
Meanwhile I cut out a piece of a grinding shield visor to for the helmet. As you can see here, the print lines are entirely gone (apart from corners that were hard to reach, but this is gonna be covered up anyway.
Before applying any paint, I'm using a truck bed liner spray (Autotek Black) to give the helmet that rugged surface
This is all the progress so far. Right now I'm trying to let the paint bed liner paint dry for at least 24 hrs before I proceed to the next step.
Feel free to post a comment, feedback or give some critique to some of the methods I've used. For now, that's all I have.
See you next post!