Stormcrow85
Hunter
This is taken from my build thread, Admins if this isn't ok let me know. I just figure someone might be able to use it to make their own darts that would maybe not find it buried in page 4 of my build thread, I also added a bit more information, I will be adding a few more photos of the tools and everything I used to make the dart later today.
If you want me to do a video of this process let me know.
I put in the wooden darts today when I put the gauntlets together and I thought "Man I like them" but the other day I picked up some aluminum rod.I made a video detailing the wooden darts, but I decided to try my hand at an aluminum dart. I will be attempting to turn quite a few of these aluminum darts out in the future, but I made one in my "home made" lathe AKA Cordless Drill in a vise. I think it turned out well and I figured people might want to know how I did it. Since this was a prototype I did not document it with video/timelapse like I normally do. This can all be done with tools that most people have readily available
What you need to make the below darts:
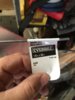
- Aluminum Rod at least 3mm in diameter
-- If you can find a 3mm diameter rod you will save yourself SO MUCH TIME
-- I just picked up this rod from home depot (they might have had a smaller diameter, but I didn't have my caliper on me to do measurements)
- A File
- Needle Files
- Hacksaw Blade
- Sand Paper (grits: 120, 220, 400, 500)
- A caliper tool to easily measure diameters
- Bench Vice
Global comments on the process:
- This is not a "super fast" process, it takes quite a bit of time
- Sand Paper is going to remove high spots so don't go TOO crazy with the file in between checking widths
- Save yourself time and start with lower grit sandpaper (like 120 grit)
- Hacksaw blades are great and adding a pilot cut or setting a "boundary"
- Be very steady in your cuts
- The side of your file is your friend
Step 1: Cut Rod to length
-- You could probably chuck a rod long enough to do all the darts up and start at the far end then work your way back (or at least 2 darts), but the farther away you get the more wobble there will be
-- Making 2 at once could save some of the material as you have to lose some to the drill chuck
Step 2: Size rod to correct diameter
-- I took the entire length to 3mm diameter
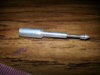
Step 3: Add point
-- File ~45 degrees, press it to the end, let it file as the lathe spins
Step 4: Make marks and cuts for the tip pieces
-- The tip is 5mm total from point to beginning of the 1.2mm wide recess
-- I made it with 2 valleys so if the point is 5mm overall that means ~.5mm from the back edge and another 1mm in front of that you want the detail valleys
-- Marking the 5mm back mark with a sharpie I went about a hacksaw blades width towards the tip and cut in the first recess
-- The hacksaw blade is very good for doing this as you hold it steady and let the drill do the cutting
-- Once the lathe gets the groove started you can move the hacksaw blade back and forth in a sawing motion to cut faster (be careful not to cut too deep)
Step 5: Cut out the valley that is 1.2mm in diameter (mine is probably closer to 1.5mm)
-- Again using the sharpie mark back from the 5mm dart tip another 7mm (it should be 12mm from the tip)
-- While the lathe is spinning use the Hacksaw blade to cut a valley at the 12mm back and the 5mm back from the tip these keep you from going to far with your file
-- I turned my flat file on its side to make it smaller and just worked it back and forth between the two initial cuts to create the valley
-- This took a little while and I measured often
Step 6: Sanding
-- I started with 120 then stepped through going 220, 400, to 500
Step 7: Admire your work.


If you want me to do a video of this process let me know.
I put in the wooden darts today when I put the gauntlets together and I thought "Man I like them" but the other day I picked up some aluminum rod.I made a video detailing the wooden darts, but I decided to try my hand at an aluminum dart. I will be attempting to turn quite a few of these aluminum darts out in the future, but I made one in my "home made" lathe AKA Cordless Drill in a vise. I think it turned out well and I figured people might want to know how I did it. Since this was a prototype I did not document it with video/timelapse like I normally do. This can all be done with tools that most people have readily available
What you need to make the below darts:
- Aluminum Rod at least 3mm in diameter
-- If you can find a 3mm diameter rod you will save yourself SO MUCH TIME
-- I just picked up this rod from home depot (they might have had a smaller diameter, but I didn't have my caliper on me to do measurements)
- A File
- Needle Files
- Hacksaw Blade
- Sand Paper (grits: 120, 220, 400, 500)
- A caliper tool to easily measure diameters
- Bench Vice
Global comments on the process:
- This is not a "super fast" process, it takes quite a bit of time
- Sand Paper is going to remove high spots so don't go TOO crazy with the file in between checking widths
- Save yourself time and start with lower grit sandpaper (like 120 grit)
- Hacksaw blades are great and adding a pilot cut or setting a "boundary"
- Be very steady in your cuts
- The side of your file is your friend
Step 1: Cut Rod to length
-- You could probably chuck a rod long enough to do all the darts up and start at the far end then work your way back (or at least 2 darts), but the farther away you get the more wobble there will be
-- Making 2 at once could save some of the material as you have to lose some to the drill chuck
Step 2: Size rod to correct diameter
-- I took the entire length to 3mm diameter
Step 3: Add point
-- File ~45 degrees, press it to the end, let it file as the lathe spins
Step 4: Make marks and cuts for the tip pieces
-- The tip is 5mm total from point to beginning of the 1.2mm wide recess
-- I made it with 2 valleys so if the point is 5mm overall that means ~.5mm from the back edge and another 1mm in front of that you want the detail valleys
-- Marking the 5mm back mark with a sharpie I went about a hacksaw blades width towards the tip and cut in the first recess
-- The hacksaw blade is very good for doing this as you hold it steady and let the drill do the cutting
-- Once the lathe gets the groove started you can move the hacksaw blade back and forth in a sawing motion to cut faster (be careful not to cut too deep)
Step 5: Cut out the valley that is 1.2mm in diameter (mine is probably closer to 1.5mm)
-- Again using the sharpie mark back from the 5mm dart tip another 7mm (it should be 12mm from the tip)
-- While the lathe is spinning use the Hacksaw blade to cut a valley at the 12mm back and the 5mm back from the tip these keep you from going to far with your file
-- I turned my flat file on its side to make it smaller and just worked it back and forth between the two initial cuts to create the valley
-- This took a little while and I measured often
Step 6: Sanding
-- I started with 120 then stepped through going 220, 400, to 500
Step 7: Admire your work.