FP Armor... painting techniques for the clandestine hunter

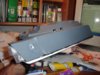
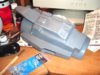
Here is the gaunt after primer and sanding.
Dsc00101.jpg


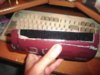
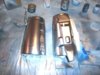
And after a coat of chrome:
Dsc00102.jpg


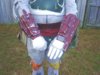
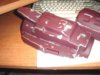
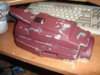
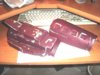
And now here it is after paint and removing the masking fluid (I love this technique!)
Dsc027701.jpg


Dsc027711.jpg


The paint ran on me a bit in places because I had it thinned to much. What I did was wipe it down quickly and then repaint it. Turns out that it actually makes it look more authentic since the real ones appear brushed in parts!
 

Attachments

  • Dsc00101.jpg
    Dsc00101.jpg
    71.9 KB · Views: 119
  • Dsc00102.jpg
    Dsc00102.jpg
    71 KB · Views: 131
  • Dsc027711.jpg
    Dsc027711.jpg
    58.4 KB · Views: 119
  • Dsc027701.jpg
    Dsc027701.jpg
    59 KB · Views: 125
The more I got to looking at my gaunt, the more I thought it was to dark. What I did was go back over it with the Rock Island Maroon in the big areas. After that I gave it a black wash and I think it came out pretty good.

DSC02774.jpg
 

Attachments

  • DSC02774.jpg
    DSC02774.jpg
    55.4 KB · Views: 126
WELL DONE!!! keep gping pavespawn!! that's just becoming a way to freakin cool costume!!:cheers
 
Thanks fellas. Just a couple more greeblies on the right gaunt, then I am off to the left! After that, all my armor pieces will be done and hopefully this will be a decent source document for all pieces armor related.
 
Jango_Wes said:
Can you explain how you do the wash method? I have tried it and my results suck.

Wes

What I did was fill one of those disposable glad cups (the little ones) with windshield washer fluid and then put a few drops of black paint in it. Then I get a rag (I used a "finishing towel" from the automotive section at Wal-Mart) and dip it in the solution. Ater that, I go over the item gently. I have gone so light on the black that it sometimes doesn't show up. I just add a little paint at a time until it starts working. It is best of course to go a little at a time but just try to remember the starting color. Sometimes the gradual change goes unnoticed until it is to late.
 
I do have to say, that the dark weathering look on this gaunt is from me going back over the base coat of Wisconsin Central Maroon with the lighter Rock Island Maroon. You can see where I did this in the big areas which left the darker parts around the scratches. I did this in an attempt to lighten the entire thing, but it actually came out better that I could have hoped for. I will be doing this on my other gaunt as well, but next time, I will not remove the masking fluid until after the top coat.
 
Just wanted to show off my progress. Well that and my new Skygunbro jumpsuit! This thing rocks! I will have to add a "lower" opening on the front for bathroom breaks. Anyway, that is a whole other tutorial :lol: .

Dsc02790.jpg
 

Attachments

  • Dsc02790.jpg
    Dsc02790.jpg
    54.6 KB · Views: 119
mandalore697 said:
Wow! Sweet stuff Pavespawn!

How did you attach your gauntlet halves?

I went with the velcro. I had to reenforce stress points on the inside of the halves (I used JB Kwik, big surprise huh?). I had this big plan to use elastic but In the end, the velcro won.

Dsc02791.jpg


Dsc0279211.jpg
 

Attachments

  • Dsc02791.jpg
    Dsc02791.jpg
    40.3 KB · Views: 126
  • Dsc0279211.jpg
    Dsc0279211.jpg
    40.7 KB · Views: 120
Quick update. I have seen some really great gaunt tutorials so I will keep this to a minimum. Here is a picture of my left gaunt in progress. I JB Kwiked the bottom cap on then bondoed and sanded. The nozzles are the same that TK-409 suggest. I did turn them out so the diamond cut side is out. To hide the threads I dabbed (you guesed it) JB Kwik on them and spread evenly:
Dsc02794.jpg


I then painted the gaunt up and sealed it with acrylic sealer:
Dsc02797.jpg


I wired up the light to the switch and mounted the battery inside the shell. That is a 9V mount I found at Radio Shack:
Dsc02798.jpg


Here is a shot of the gauntlets put together minus the rocket:
Dsc02805.jpg


And a full shot with my helmet paintshopped in:
smlDsc02804helmet.jpg
 

Attachments

  • Dsc02794.jpg
    Dsc02794.jpg
    59.9 KB · Views: 120
  • Dsc02805.jpg
    Dsc02805.jpg
    99.3 KB · Views: 126
This thread is more than 18 years old.

Your message may be considered spam for the following reasons:

  1. This thread hasn't been active in some time. A new post in this thread might not contribute constructively to this discussion after so long.
If you wish to reply despite these issues, check the box below before replying.
Be aware that malicious compliance may result in more severe penalties.
Back
Top