You are using an out of date browser. It may not display this or other websites correctly.
You should upgrade or use an alternative browser.
You should upgrade or use an alternative browser.
Superjedi's FPH-ESB for Grifter
- Thread starter superjedi
- Start date
superjedi
Sr Hunter
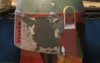
Thanks. Well, on the rear of the dome, there's such a concentration of fine scratches, it's really difficult to tell which are
"original" damage and which are "incidental." But there are some that are visible in screen shots, so I add them.
Everything you see so far on the front parts is the screen-used version. There are more/better shots of the front angles so
it's easier to determine which scratches were present during filming. I have done a couple of SE helmets before, but this
won't be one of them.
superjedi
Sr Hunter
Hi Demmoc. Thanks! It's not easy, it's never easy. But as I mentioned in the first post in this thread, this is my 20th ESB paint up.
So I've developed some patterns and techniques that I think are good time savers.
It was certainly daunting when I was doing my first couple of helmets, I had to figure out the best "order of operations" and how to move
from one stage to the next. Over the years I've not only worked out a good system of progressing through the paint job, but I've also
organized my hobby area to the point where literally everything I need is within arm's reach. I can find any given tool or supply with my
eyes closed. So I think that having a dedicated, organized space to work is really important, too.
I'm always happy to share my progress and hopefully some of my explanations will help other TDHers with their projects.
So I've developed some patterns and techniques that I think are good time savers.
It was certainly daunting when I was doing my first couple of helmets, I had to figure out the best "order of operations" and how to move
from one stage to the next. Over the years I've not only worked out a good system of progressing through the paint job, but I've also
organized my hobby area to the point where literally everything I need is within arm's reach. I can find any given tool or supply with my
eyes closed.
So I think that having a dedicated, organized space to work is really important, too.I'm always happy to share my progress and hopefully some of my explanations will help other TDHers with their projects.
mainst69
Active Hunter
Hi Demmoc. Thanks! It's not easy, it's never easy. But as I mentioned in the first post in this thread, this is my 20th ESB paint up.
So I've developed some patterns and techniques that I think are good time savers.
It was certainly daunting when I was doing my first couple of helmets, I had to figure out the best "order of operations" and how to move
from one stage to the next. Over the years I've not only worked out a good system of progressing through the paint job, but I've also
organized my hobby area to the point where literally everything I need is within arm's reach. I can find any given tool or supply with my
eyes closed.
I'm always happy to share my progress and hopefully some of my explanations will help other TDHers with their projects.
that's an interesting topic that you brought up. As a complete (and terrified) novice to the airbrush, I'd be interested in a work area orginazational/workflow how-to write up. I've been giving it a lot of thought waiting to paint my lid/armor on setting up my paint area.
love to see an SJ "behind the scenes"!
superjedi
Sr Hunter
Hi Mainst69, I took a few pics of my hobby space and threw a thread together in the Sarlacc Pit. Hope this gives you some ideas. ")
http://www.thedentedhelmet.com/f22/whats-your-hobby-area-look-like-55031-post688809/#post688809
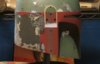
I finished the last section of the rear half of the band. There are some reeeeally fine silver scratches throughout this area and I used
my 18/0 brush to do these. I also blocked in the Earth color on the RF ear arch and painted the pale gray in the panel between the
upper and lower ear platforms. This is the same gray that I'll use for contrast on the rest of the helmet.
I've included two pics this time so I don't get yelled at again.

The ear arch is painted by hand. I just think it's a lot of trouble to mask it off for a relatively small area. A nice fresh detail brush is a must
for getting a clean edge. If you have a brush where the bristles are starting to separate or curl over, it's time for a new one.

Now it's time to begin the mandibles! I'll be starting on the left side at the corner of the visor opening, then working on the "brow" above the opening.
http://www.thedentedhelmet.com/f22/whats-your-hobby-area-look-like-55031-post688809/#post688809
I finished the last section of the rear half of the band. There are some reeeeally fine silver scratches throughout this area and I used
my 18/0 brush to do these. I also blocked in the Earth color on the RF ear arch and painted the pale gray in the panel between the
upper and lower ear platforms. This is the same gray that I'll use for contrast on the rest of the helmet.
I've included two pics this time so I don't get yelled at again.
The ear arch is painted by hand. I just think it's a lot of trouble to mask it off for a relatively small area. A nice fresh detail brush is a must
for getting a clean edge. If you have a brush where the bristles are starting to separate or curl over, it's time for a new one.
Now it's time to begin the mandibles! I'll be starting on the left side at the corner of the visor opening, then working on the "brow" above the opening.
Attachments
superjedi
Sr Hunter
Wow, thanks man. I really appreciate the kind words.
I've been a member here for over a decade now and when I first joined, it was with the intent of asking some "veteran" Fett heads their opinions about
a fully painted ESB helmet that I was going to buy on eBay. As it turns out, they were very welcoming and gave me some very straightforward info
regarding the helmet that I wound up not purchasing. In addition, I got into some discussions with a few of them and mentioned that I had some hobby
skills from building models and things like that. They encouraged me to try my own paint up on a Sgt. Fang helmet kit. For any of you who remember,
the Fang bucket was the top of the heap back then.
I asked many questions along the way, and got some great advice and tips. All of us here on TDH share a love for Fett, some to the point of being
obsessive about it! I always think about those long-time members who took the time to help a newbie like me, and I try to help other members
out when I can. Just paying it forward. TDH is one of the few websites that I literally take time to check every day, and not just to post progress when
I'm working on a commission. There's so much talent and creativity on the board and I really enjoy checking out everyone's work.
I've been a member here for over a decade now and when I first joined, it was with the intent of asking some "veteran" Fett heads their opinions about
a fully painted ESB helmet that I was going to buy on eBay. As it turns out, they were very welcoming and gave me some very straightforward info
regarding the helmet that I wound up not purchasing. In addition, I got into some discussions with a few of them and mentioned that I had some hobby
skills from building models and things like that. They encouraged me to try my own paint up on a Sgt. Fang helmet kit. For any of you who remember,
the Fang bucket was the top of the heap back then.
I asked many questions along the way, and got some great advice and tips. All of us here on TDH share a love for Fett, some to the point of being
obsessive about it!
I always think about those long-time members who took the time to help a newbie like me, and I try to help other membersout when I can. Just paying it forward. TDH is one of the few websites that I literally take time to check every day, and not just to post progress when
I'm working on a commission. There's so much talent and creativity on the board and I really enjoy checking out everyone's work.
mainst69
Active Hunter
Hi Mainst69, I took a few pics of my hobby space and threw a thread together in the Sarlacc Pit. Hope this gives you some ideas.
http://www.thedentedhelmet.com/f22/whats-your-hobby-area-look-like-55031-post688809/#post688809
I finished the last section of the rear half of the band. There are some reeeeally fine silver scratches throughout this area and I used
my 18/0 brush to do these. I also blocked in the Earth color on the RF ear arch and painted the pale gray in the panel between the
upper and lower ear platforms. This is the same gray that I'll use for contrast on the rest of the helmet.
I've included two pics this time so I don't get yelled at again.

The ear arch is painted by hand. I just think it's a lot of trouble to mask it off for a relatively small area. A nice fresh detail brush is a must
for getting a clean edge. If you have a brush where the bristles are starting to separate or curl over, it's time for a new one.

Now it's time to begin the mandibles! I'll be starting on the left side at the corner of the visor opening, then working on the "brow" above the opening.
yeah, better stick to the 2 pic minimum to be on the safe side! Lol
Last edited by a moderator:
superjedi
Sr Hunter
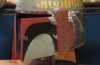
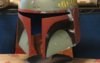
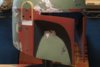
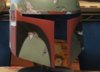
The front half is moving along. I finished the area at the left corner of the visor. Since this is a screen used helmet, it doesn't
have any of the crack repair and resulting putty residue like on the SE version.

I also did the left half of the brow area. There isn't a whole lot going on in this area, but I do like that big silver chunk.
Here are a couple of different angles.


I'll work on the right half of the brow next. There's significantly more detail in that portion.
have any of the crack repair and resulting putty residue like on the SE version.
I also did the left half of the brow area. There isn't a whole lot going on in this area, but I do like that big silver chunk.
Here are a couple of different angles.
I'll work on the right half of the brow next. There's significantly more detail in that portion.
Attachments
mainst69
Active Hunter
SJ,
I know different sections have more damage or types of things to paint in, but on average, ball parking it, how long do you spend on each little sub section? Like say, these three pics, hour? Two? I ask because I'm mentally trying to budget how long it will take (I'll of course add hours for my inexperience). Just curious on time frames.
I know different sections have more damage or types of things to paint in, but on average, ball parking it, how long do you spend on each little sub section? Like say, these three pics, hour? Two? I ask because I'm mentally trying to budget how long it will take (I'll of course add hours for my inexperience). Just curious on time frames.
superjedi
Sr Hunter
That's a good question, and the answer is . . . it depends.
Not a great answer, eh? But seriously, it does depend on a few factors. First of all it does depend on which
part of the helmet you're talking about. Something like the dent is going to take longer than the smaller spot
above the turn signals on the front of the dome.
Secondly, it depends on what technique you're using. For accuracy's sake a lot of us use templates or stencils
to get the sizes and positions of the damage areas as close as we can. But each small area (generally) has
multiple colors involved. Take that left half of the brow for example. There's the gray, the silver, the maroon/purple,
and some small flecks of the base red. Are you going to make and apply stencils for each individual color, or are
you going to make a stencil that includes all of the color breaks, or are you going to simply make a single stencil
for the most predominant color and then gauge the other colors by eye?
Lastly, it depends on your experience level. Have you tackled this particular paint style before, or is this your first
attempt at the ESB? Please keep in mind that "this ain't my first rodeo" and I have a very concrete plan of attack
when I do one of these helmets. If it's someone attempting it for the first time, or if I were to attempt a different style
that I hadn't done before, it would take considerably longer.
In regard to your question though, I don't really keep myself on a clock when I'm working, but I'd say that the left half
of the brow (not including the separate area at the corner of the visor) took me probably a little over an hour. Definitely
less than two hours. That's from the first application of the stencils to the time the final flecks of color were applied.
When you (or anyone) are working on a project like this, it's important to work at a pace that makes you comfortable.
It can seem overwhelming at first, but when you take a small section at a time it makes it easier. Don't hold yourself
to any deadlines. I've been approached about doing commissions on a short timeline, like someone asking me on
October 1st if I can do a helmet for them by Halloween, and I always tell people I can't commit to anything like that.
There's too much that can happen in real life, and I don't like to rush or feel like I'm being rushed to finish a project
for someone.
Not a great answer, eh? But seriously, it does depend on a few factors. First of all it does depend on which
part of the helmet you're talking about. Something like the dent is going to take longer than the smaller spot
above the turn signals on the front of the dome.
Secondly, it depends on what technique you're using. For accuracy's sake a lot of us use templates or stencils
to get the sizes and positions of the damage areas as close as we can. But each small area (generally) has
multiple colors involved. Take that left half of the brow for example. There's the gray, the silver, the maroon/purple,
and some small flecks of the base red. Are you going to make and apply stencils for each individual color, or are
you going to make a stencil that includes all of the color breaks, or are you going to simply make a single stencil
for the most predominant color and then gauge the other colors by eye?
Lastly, it depends on your experience level. Have you tackled this particular paint style before, or is this your first
attempt at the ESB? Please keep in mind that "this ain't my first rodeo"
and I have a very concrete plan of attackwhen I do one of these helmets. If it's someone attempting it for the first time, or if I were to attempt a different style
that I hadn't done before, it would take considerably longer.
In regard to your question though, I don't really keep myself on a clock when I'm working, but I'd say that the left half
of the brow (not including the separate area at the corner of the visor) took me probably a little over an hour. Definitely
less than two hours. That's from the first application of the stencils to the time the final flecks of color were applied.
When you (or anyone) are working on a project like this, it's important to work at a pace that makes you comfortable.
It can seem overwhelming at first, but when you take a small section at a time it makes it easier. Don't hold yourself
to any deadlines. I've been approached about doing commissions on a short timeline, like someone asking me on
October 1st if I can do a helmet for them by Halloween, and I always tell people I can't commit to anything like that.
There's too much that can happen in real life, and I don't like to rush or feel like I'm being rushed to finish a project
for someone.
mainst69
Active Hunter
Awesome, thanks for the feedback. Yeah, I don't have any real hard and fast deadlines (well, last week of October, but that's why I started the build in January!) I don't like to put that kind of pressure on myself, part of the reason I have this for a hobby is for it to be enjoyable. If it starts to seem like work, I just take a step back, do something else until I get the itch. I might play guitar or do something fun with my daughter or do some research on TDH for the next aspect of my build. Like I have a partially finished codpiece that needs some more work, before I can even get to the sanding and primer stage on it, but I haven't been able to get that back on the front burner! Been making other things for other folks!
OK, well, I'll be impatiently awaiting the next two pics of this lucky owners helmet.
OK, well, I'll be impatiently awaiting the next two pics of this lucky owners helmet.
intwenothor
Well-Known Hunter
What gets me is the unrivalled consistency with these SJ paintups with every one being so smooth and detailed; as constant as the northern star (I'm not suggesting he's about to be hacked to death by angry senators). It really is wonderful work.
superjedi
Sr Hunter
Thanks a lot, guys! I appreciate it.
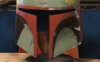
The brow is done now. I did the right half in a couple of sessions over the last 2 days. Lots of tiny chips and scratches.

Just a couple of physical scratches left to add. There's also a bit of the pale contrasting gray in this section. I'll do that
at the end. I just find it easier to do it all at once.

The mandibles are up next!
The brow is done now. I did the right half in a couple of sessions over the last 2 days. Lots of tiny chips and scratches.
Just a couple of physical scratches left to add. There's also a bit of the pale contrasting gray in this section. I'll do that
at the end. I just find it easier to do it all at once.
The mandibles are up next!
Attachments
Similar threads
- Replies
- 66
- Views
- 1,926