"Nubs" on the back of the helmet. you know, inside the slots?

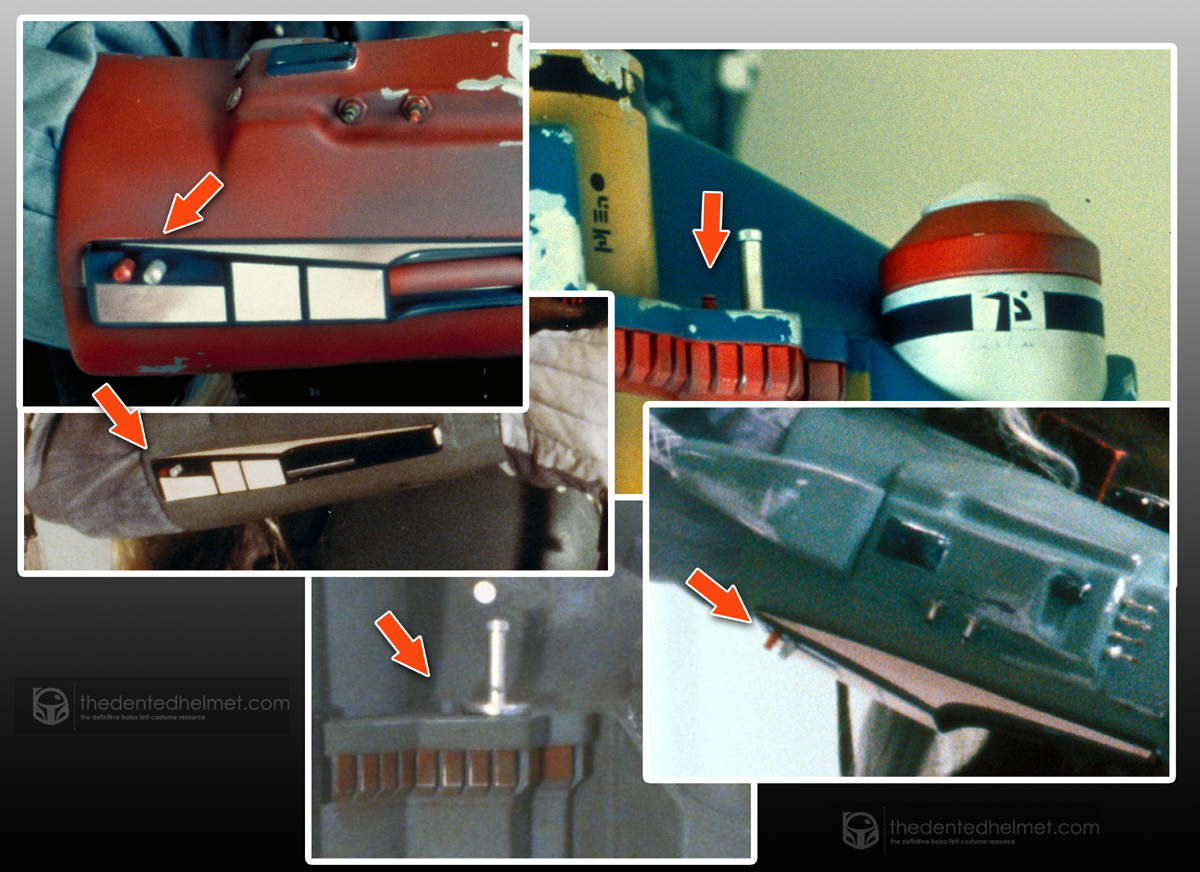
I completely didn't make a connection here with the nubs being the same as the ones on the ESB guantlet... and I never noticed the nub on the ESB jetpack! Wow! Thanks Spidey!

Im sure most of you knew, but these can also be found on the Supertrooper, PrePro1, and ESB Gauntlets and Jetpack... (y)

attachment.php
 
quick mock up before i cast in chrome (will be able to iron out all the creases when in metal)(he HOPES), and a quick paint job, didnt have much time so coats never dried leaving drag marks ect (this is why i dont paint houses).
IMG_1132.JPGundercoatIMG_1134.JPGwrong color red but was all i had, model shop was shutIMG_1136.JPGmetallicIMG_1137.JPGtried to make it real dirty (sarlac fett natenub)
 
This is what I had after a very short time messing around...
I used things such as the key slots and the chip on the MQ1 calc for scaling, obviously needs more work. :lol:

Very nice! I thought I saw a second, thinner groove at the bottom, and maybe the top isn't so rounded...? I found a render I did back in '06:

knobs.jpg
 
I agree there is a second lip around the base and maybe not as rounded but I only spent about 10mins on it? ;)
Nice render, the top undercut should leave the small part at the top ridge more rounded I think.
 
Have you tried these in the keyslots to see if theyre even the right size? I mean if they dont fit its a waste of time completely

Fett 4 Real good point and shamefully ill admit that all i had to work with was the rubies deluxe and hasbro helmet and i used the WOF templates for the calc and vent/keyslot area. the nate-nub looked against the rubies really big so that was good i thought as a wise man mentioned to me when i was going to purchase his FP premium id be able to pull his helmet over my head with the rubies still on with regard to upscaling the nub. i could really increase the size or decrease if needed and i wouldnt want to embaress myself by putting something out that looked crapola these are only mocks. I have a GMH on order from Chris so im hoping that when that arrives it will give me some scale to be more accurate, and in the meantime was just tomfoolin around as i always have time to waste on boba, and just show as a bit of a tutorial that you guys with a few simple materials could nail this yourselves.

working with dentists i have asked for there guidence on this, ones that were working with these types of files back in the 70-80s and they seem to think that it is close but untill we have the real thing they will never be 100% i guess
 
Last edited by a moderator:
Hay Evilhemmes you said that you were going to cast them in metal just curious what kind of metal would you use, And what materilal would you make the cast from? i remember as a kid i used to make lead soldgers on the cook top and poor them in to a mold of a tuff ruber would it be somthing like that
 
Hi Jinto going to use chrome (strong metal) and can trim and shape it with diamond cutting burs, tungsten carbides, and use an Phosphate bonded precision investment material, looks like a chocolate type plaster/stone similar to the stuff you would use to bog up a gypbrock wall, can take a high heats without crumbling, will use an induction casting machine to cast the metal into it. so in some ways similar to your lead rubber method, heatsoaking for the muffle (phosphate investment) about 1050 C and melting temp for metal to liquify 1410 C

will take some photos at a later date of this process
 
Last edited by a moderator:
the kind of setup that spins and slings the metal into the mold right from the crucible? The stone you use will quickly disolve in water after the investment right, are you gonna cast a bunch on a spure or one at a time? I used to work at a jewelry store and at a denture makers lab.
 
the kind of setup that spins and slings the metal into the mold right from the crucible? The stone you use will quickly disolve in water after the investment right, are you gonna cast a bunch on a spure or one at a time? I used to work at a jewelry store and at a denture makers lab.

right on there Woodman that was how i used to cast till we got a machine now that does it all for us, so no more winding and ducking for cover (lol) swinging a bucket or having to light oxy acetylene. with chrome the investing material wont dissolve but it easy to break away to get to the cast inside, but we do your above mentioned method when casting with paladium and gold for inlays, bridges, root posts ect
and will cast a bunch on 1 sprue for sure, will try and do my own borden as well out of chrome.
 
the kind of setup that spins and slings the metal into the mold right from the crucible? The stone you use will quickly disolve in water after the investment right, are you gonna cast a bunch on a spure or one at a time? I used to work at a jewelry store and at a denture makers lab.

And there i was thinking i was all tec, talking about pouring lead on a stove top
 
And there i was thinking i was all tec, talking about pouring lead on a stove top

(makes mental note never goto Jintos house for spaghetti bolognaise) Cooked in the same pot you made those lead soldiers in LOL:lol:


I agree there is a second lip around the base and there is a slight taper to them as well, maybe not as rounded but I only spent about 10mins on it? ;)
Nice render, the top undercut should leave the small part at the top ridge more rounded I think.
 
Last edited by a moderator:
Here's one of the newer "Hedstroem" files temporarily positioned inside the keyslots of one of my helmets. Pretty good for size but looks like it has less knurling down the sides and no number of the top.

DAZ

Hedstroem.jpg
 
This thread is more than 13 years old.

Your message may be considered spam for the following reasons:

  1. This thread hasn't been active in some time. A new post in this thread might not contribute constructively to this discussion after so long.
If you wish to reply despite these issues, check the box below before replying.
Be aware that malicious compliance may result in more severe penalties.
Back
Top