First Time Build - Boba Fett Helmet - Cardboard - FINISHED

Magnavis

Hunter
Hello, I'm pretty new here, and have never done anything like this before. But I like throwing myself into the deep end when learning new things, and learning to swim as I go, so this should be...fun? (it should be fun, right?)

I've ordered some 2mm Greyboard which I have seen recommended on this forum and the RPF, so I have to wait for that to arrive. But I have put together the inner support for the helmet, as I had some mounting board left over from an old project, and it seems to have done the trick nicely. I won't post a pic of that, there is really nothing to see, and I'm sure you've all seen the support frame before.

I plan to combine the methods of two on this forum to construct the main pieces. RafalFett and Ant Man (where did he go?) but I have a few general questions about the project which id like some advice on so I can plan ahead as much as possible.

General Construction Tips

I have seen people put the cardboard pieces together using either a hot glue gun or PVA wood glue. Which is better to use? Hot glue will dry much quicker, but PVA is probably stronger I guess.

I also want to know about sealing the piece once it has been constructed. Pepakura pieces are covered inside and out with Fiberglass resin, and then coated on the inside with Fiberglass. Is that necessary for a cardboard build too, or would you be able to get away with just coating it in the resin before applying filler.

Are there any good guides on here about using 'bondo' filler? I've seen plenty of YouTube vids that cover applying/mixing the bondo, but not too many actually go through the sanding and shaping process in any real detail. Is it literally a case of sanding and applying 'bondo' until it's smooth?

As I say, I've done nothing like this before, but I would like to do a half decent job, and hopefully learn some stuff along the way. Any other general tips you can give a noob would be greatly appreciated.
 
I've been working on a helmet for awhile now, maybe it will help you.
Le1120's Second Cardboard Helmet Scratch Build -- WIP


I use hot glue. It's as strong as is necessary, and will keep things in place quickly.

I don't think resin is necessary at all for a cardboard scratch build (at least I've never seen it done with that) and what I use to seal the cardboard is just some polyurethane (like you might put on your wooden floor), though I don't know if resin won't work.

And yes, basically just apply bondo and sand till your satisfied with it. I personally use a palm sander and a dremel to shape the helmet where it's needed.
 
Last edited by a moderator:
I've been working on a helmet for awhile now, maybe it will help you.
Le1120's Second Cardboard Helmet Scratch Build -- WIP


I use hot glue. It's as strong as is necessary, and will keep things in place quickly.

I don't think resin is necessary at all for a cardboard scratch build (at least I've never seen it done with that) and what I use to seal the cardboard is just some polyurethane (like you might put on your wooden floor), though I don't know if resin won't work.

And yes, basically just apply bondo and sand till your satisfied with it. I personally use a palm sander and a dremel to shape the helmet where it's needed.

I was looking through your thread yesterday, very nice work :) It looks as if you have applied bondo across the entire outer layer of the helmet?
 
Last edited by a moderator:
Yes, basically I covered the dome and another couple areas completely with bondo, then sanded right to the cardboard in some places. However the bondo I used first was bondo glass (green stuff) which is quite strong and makes for a good foundation to put the normal (pink) bondo on top of.
 
Last edited by a moderator:
I've just started coating mine with paper and pva glue layers, going to give a couple of coats inside and out before going down the bondo route
 
Last edited by a moderator:
Subscribing to the deep end guys! About to start my own cardboard build and as soon as I can work up the courage to let go of the edge I'll head out to the middle.
 
Last edited by a moderator:
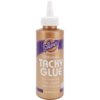
I personally used a glue called Tacky Glue.
image.jpeg
It is a white glue that dries faster and bonds stronger than your average wood glue. Got it at Hobby Lobby, but they also sell it at Walmart.

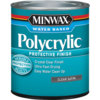
I sealed the helmet with Polycrylic by Minwax.

image.jpeg

Then you can Bondo the dome, cheek areas, and any other seams tha you need to cover. I used a palm sander to smooth out the dome and did the smaller areas by hand using several different grits of sandpaper until smooth.

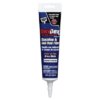
I also used this for the small detail areas with great results. It's easier to work with than Bondo.

image.jpeg
Goes on pink and turns white when dry.

image.jpeg


image.jpeg


image.jpeg
 
Last edited by a moderator:
I did start building mine before Christmas (hence making this post), but am gonna start it again as it was a bit messy. I was wondering if anyone in the UK had used polyfiller instead of bondo? Or what the best UK equivelent of Bondo is?
 
Last edited by a moderator:
I did start building mine before Christmas (hence making this post), but am gonna start it again as it was a bit messy. I was wondering if anyone in the UK had used polyfiller instead of bondo? Or what the best UK equivelent of Bondo is?


''Bondo'' equivalent here in the UK is just two part car body filler you can get at Halford's that's all it is. I personally use a good quality multi purpose wall filler (like polyfiller) and mix it with wood glue to make a smooth paste, sets like rock and easy to smooth working your way up the grit etc..
 
Last edited by a moderator:
''Bondo'' equivalent here in the UK is just two part car body filler you can get at Halford's that's all it is. I personally use a good quality multi purpose wall filler (like polyfiller) and mix it with wood glue to make a smooth paste, sets like rock and easy to smooth working your way up the grit etc..

huh, good to know. Polyfiller is really easy to work with. By wood glue, do you basically mean PVA?
 
Last edited by a moderator:
huh, good to know. Polyfiller is really easy to work with. By wood glue, do you basically mean PVA?

yes PVA. The 'Evo stick' wood glue really does stick strong however. there is two ways you can go about it, Car filler all over and sand that or use multi filler. if you do the multi filler don't be shy with that PVA and mix it really well.

This is what works for me and I wont say its the only way to do it so keep an open mind when others put forward what works for them, (y)

Oh and don't forget to fiber glass the inside of the helmet, you will 100% need to do this if you are making a cardboard helmet...
Davids Fastglass Glass Fibre Kit -...
 
Last edited by a moderator:
I've finally started building! (only took 4 months -_-) Quick question about the inner support. I some how managed to flip the support left and right (using Rafals template) so the left support is on the right, and vice versa. It doesn't look like it really matters, but was just wondering if it actually does?

will post a pic tomorrow when glue has dried, but not that exciting...we've all seen the inner support before.
 
Last edited by a moderator:
One way tell if you're way off is 2 print 2 copies, cut both out & then flip one over and see how the edges align. I'm not sure if there is a huge difference as far as supports are concerned. The important thing is the angle...I ended up adding a little more to mine anyway.
 
Last edited by a moderator:
Right, inner support built. Not much to show, but will upload some pics anyway. Came out pretty good. Ended up putting some little tabs to plug in to some holes I cut for the cross support, just to make it easier to glue. Used PVA for top, but just used a glue gun and a couple of little beads for the rest. Seems strong enough. Will now cut out the inner and outer layers, and form them to the general shape, and try to clamp them in a circle overnight so that they retain the shape, and make it easier to glue.

2016-05-03 16.30.30.jpg2016-05-03 16.30.48.jpg2016-05-03 16.31.00.jpg

2016-05-03 16.30.30.jpg


2016-05-03 16.30.48.jpg


2016-05-03 16.31.00.jpg
 
Last edited by a moderator:
Inner layer cut out. Sprayed both sides lightly with water and then formed to a rough circle, and clamped shut. My brain tells me that when that drys, it will retain its shape and be easier to glue? Can someone smarter than me confirm haha! [EDIT] It worked, hooray!

2016-05-04 13.57.32.jpg2016-05-04 13.58.00.jpg2016-05-04 13.58.10.jpg

2016-05-04 13.57.32.jpg


2016-05-04 13.58.00.jpg


2016-05-04 13.58.10.jpg
 
Last edited by a moderator:
quick question, what do you actually glue the inner layer too? the little strip round the back and the dome support? Ive currently got the inner support taped in several places to hold its place. If I were to put PVA around the top edge and let it soak in and dry, would that hold it? Don't make much sense to glue it too the inner supports too much as it all get removed?
 
Last edited by a moderator:
Well it seems to have worked. Taped it in place as tight as I could get it, and then put PVA around a few bits at the top. Dried within couple of hours and was stuck enough for me to remove tape. Couple of little tweaks, and then put a second load of PVA, this time all around the top. Seems pretty sturdy. Will probably add some more PVA, or glue gun beading once the inner support eventually comes out. On to the outer layer tomorrow. Coming together, and a lot cleaner than my first attempt! Should I cut the rear hole out before putting the outer layer on do you think?
2016-05-04 21.53.51.jpg2016-05-04 21.54.06.jpg2016-05-04 21.57.09.jpg

2016-05-04 21.53.51.jpg


2016-05-04 21.54.06.jpg


2016-05-04 21.57.09.jpg
 
Last edited by a moderator:
Getting the outer layer on was more difficult than I thought. But by using clamps and a lot of tape, I eventually managed it. Glue should be dry soon so I can take all the tape off and see how it is..
2016-05-05 18.06.06.jpg

2016-05-05 18.06.06.jpg
 
Last edited by a moderator:
My first "Well that was stupid moment" - put a load of hot glue on a bit of the left cheek, and then grabbed it to hold it in place, forgetting about the hot glue. Ouch!

Left cheek done, a little messier than I would have liked, but looks kinda ok? Not sure if it's far in enough. Found it quite challenging to get it all squeezed in, but hopefully I can do the right one a little easier, and not burn my fingers off!
2016-05-06 16.09.55.jpg2016-05-06 16.10.07.jpg2016-05-06 16.10.27.jpg

2016-05-06 16.09.55.jpg


2016-05-06 16.10.07.jpg


2016-05-06 16.10.27.jpg
 
Last edited by a moderator:
This thread is more than 7 years old.

Your message may be considered spam for the following reasons:

  1. This thread hasn't been active in some time. A new post in this thread might not contribute constructively to this discussion after so long.
If you wish to reply despite these issues, check the box below before replying.
Be aware that malicious compliance may result in more severe penalties.
Back
Top