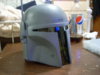
these can come out great! I modded mine alot...basically matching it up with my bobamakerhelmet for angles and measurements. I ended up taking a bit off most of the bottom rear of the helmet. and reshaping the cheeks a bit. i also built the dome with the template and then just slapped on ALOT of bondo in the basic shape and sanded it till i liked the result. To make the ears i only used the template for the width of them. I cut a piece of ABS to the shape and built up the entire shape with bondo on the ABS sheet, carving the bondo before it fully cured. Once i was happy with it, i took a mold from it and cast it in fiberglass. you can get an excellent helmet from these templates. Here is my result:
here is the photobucket album of the build: Scratch build Fett helmet pictures by nycpunker - Photobucket
Its kinda backwards..i added the ears bu8ild last so they are first....but if you start from the last page and work your way to the fisrt, you'll see how i did it.
Once again i must thank WOF for these great templates.
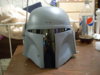
I'm kinda new here too, but I'm active on CT.N and the Mercs. I've had this where it is for a long time now. Still haven't put in the binoculars, greeblies, or a better tinted visor, but for my first attempt I'm rather pleased. These templates are so easy to work with. Thank you so much WOF!
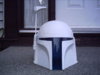
I love airborne troopers, so I stole the paint scheme and weathered it so it looks like this went through some serious jumping while the ship was, oh, I dunno... on fire. And sorry for the poor picture quality. My basement is poorly lit and these are phone pix.
Can someone tell me...I printed out the helmet template at 100% and then the dome sections so that the scaling key matches the 1 inch intervals. Is that what I needed to do for these to match up properly? I just wanted to make sure since the helmet has no size reference on it other than printing it at a certain percentage. Thanks!!
I just printed the A4 templates directly at 100%, both for the helmet and the dome, (Pages 26-28), and it seemed to match up fine, with a little persuasion. I followed AntMan's method using the 2mm Card.
When I made mine, I too noticed that the dome is too tall. I printed my templates at full size ( 100 percent ), and I removed 5mm from the bottom of the dome. It looks pretty darn good now.
Wow! Six years and running for this post. I noticed a few years back someone requested a tutorial for these great templates - did we ever get one besides the ones at Making the dome frame ?
I am puzzled with the inner/outer lining and if they are directly attached to one another.To say the directions are lacking in detail would be an understatement and it glosses over very important steps, unless you have to be a paying member of the site to get full instructions or I am a little dense? In one of the pictures it clearly show quite a gap between layers and it appears to be filled with a ring insert, so that is where my confusion comes in. Sorry if this has been covered already. Thanks in advance.
I have figured out the question posted previously, just kind of came to me after looking at the **** pieces for a while. Does anyone use the removable frame? I saw Antman's great tutorial and he looks as if he skipped it?
I have figured out the question posted previously, just kind of came to me after looking at the **** pieces for a while. Does anyone use the removable frame? I saw Antman's great tutorial and he looks as if he skipped it?
With the removable frame are you reffering to the inner form parts? You need those to give your helmet it's distinctive shape, and after you glue on the inner and outer parts and the dome rings, you may need to remove those (these are just temporary parts) so you can work on the visor and the cheeks.
I was talking about the same thing. You need to apply glue just on the upper edge of the Helmet Form (to attach it to the Dome Base; this will be cut in a ring form and the glued parts will come out easily) while on the side edges use just drops of glue.
Thanks Raf, the AntMans was super helpful, I was having the same confusion as PlayFord up there, but now I see that, the attachment he is referring to is just a temp base in which to form my inner surface with, is this a correct conclusion?
Thanks Raf, the AntMans was super helpful, I was having the same confusion as PlayFord up there, but now I see that, the attachment he is referring to is just a temp base in which to form my inner surface with, is this a correct conclusion?
hey im a newy i been looking at the templates and decide to try. i put together helmet using the templates and wanted to know if the process still works with any kind of tape? cause i ran out of scotch and had to use duck tape on the whole outer and dome parts.
hey im a newy i been looking at the templates and decide to try. i put together helmet using the templates and wanted to know if the process still works with any kind of tape? cause i ran out of scotch and had to use duck tape on the whole outer and dome parts.