HAIRYGOOCH1979
New Hunter
looks great. one question how did you form the dents on the armor. not the weathering the indentations. heat gun?
Riceball: I have been using fine sandpaper(1000 grit) is steel wool similar? I like the way it totally changes the surface.
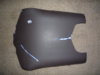
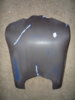
") I'm on my third go at a backplate, and it's just not working :facepalm:wacko:confused. Any tips or tricks I might not know?
I'm on my third go at a backplate, and it's just not working :facepalm:wacko:confused. Any tips or tricks I might not know?dankenman, that is one of the best trash can armour builds I have ever seen!!!:cheers Splendid work!!! You backplate is amazing!!!
Awesome stuff!!!
:cheers
A'den
looks great! i've seen some beautiful sets of fett and custom armor built from trashcans. i've never tried it myself. my only apprehension with the trashcan armor is how thin it is. it just doesn't have the depth i think of when i think of armor plating. personally, i prefer the 3mm sintra although when properly formed, i've seen vac formed armor that gives the illusion of being thicker than it is due to rolled edges.
can't wait to see your progress here! is this gonna be a fett or a custom project?
Nice tip. I am going to try that on my next one. Do you have any problems heating with the torch? I would think a blowtorch would be a bit more difficult than a heat gun. With the heat gun there is no flame and the heat is very controllable. I'm just saying if you are looking to purchase something, the heat gun is more of a controllable tool, IMO. Also this material cools fairly quickly, but I still think cold water is great. It will re-solidify the piece almost instantly.Originally posted by Jaiden:
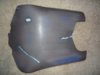
Not trying to hijack, but what part of the backplate are you having problems with? If you use the Sterilyte can and put the back armor pattern on one full side, the lower piece will have the perfect curve and the only parts that will need bending are the shoulders. What I did was, as dankenman said, use heat - specifically a blowtorch lightly passing over to heat it up. I had it on my mannequin to help with the forming. USE GLOVES!!! I used a roll of duct tape to roll it into shape, and then taped the newly formed shoulders to the mannequin to allow it to cool in the right form. Any tape adhesive that comes off because of the heat can be sanded off before you paint.
Nice tip. I am going to try that on my next one. Do you have any problems heating with the torch? I would think a blowtorch would be a bit more difficult than a heat gun. With the heat gun there is no flame and the heat is very controllable. I'm just saying if you are looking to purchase something, the heat gun is more of a controllable tool, IMO. Also this material cools fairly quickly, but I still think cold water is great. It will re-solidify the piece almost instantly.Originally posted by Jaiden:
Not trying to hijack, but what part of the backplate are you having problems with? If you use the Sterilyte can and put the back armor pattern on one full side, the lower piece will have the perfect curve and the only parts that will need bending are the shoulders. What I did was, as dankenman said, use heat - specifically a blowtorch lightly passing over to heat it up. I had it on my mannequin to help with the forming. USE GLOVES!!! I used a roll of duct tape to roll it into shape, and then taped the newly formed shoulders to the mannequin to allow it to cool in the right form. Any tape adhesive that comes off because of the heat can be sanded off before you paint.